How to Create Alert Notification!
Hello Mule'es,
In this Blog, you are going to learn about "How to Create Alert Notification"!
Let's Begin👍!
Alert Notification:
when any error occurs in the application, it will inform to the particular recipient through mail.
Let's see how it works!
As we already seen deployment of customer-e-api in our previous blog, If not please go through my
blog "Deploying in cloud Hub".
Let's Begin👍!
Let's create one more mule configuration file in customer-e-api that call-alert.xml.

img-1
This consist of cloud hub create Notification, so that if any error triggers it will redirect the
error message to the particular recipient.

img-2
This is a sub flow whose name is cloud notification.
Let's drag a Transform Message which captures the error details!

img -3
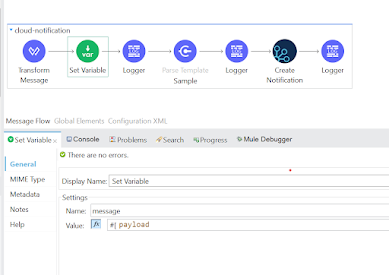
Now drag and drop the set variable component. Set the variable name as message and value as payload.
img-4
Logger is used to print the content in the console.

img -5
Now, we are using a parse Template which helps to be in a particular Form.
Parse Template is the Mule component to use for processing a template and Obtaining a result.
A template is defined as text with embedded Mule expressions that are evaluated and replaced with
their result.
You can configure this in 2 ways.
1. you add an external file
2. you can embed in the component definition itself.
Drag and drop the parse template component as shown in the below screen shot.

img - 6
I have configured with an external file as HTML.

img-7
This is the HTML code which I configured above.
<!DOCTYPE html>
<html>
<body style="background-color:black; color:white;">
<ul>
<li> <b>transactionId: </b> #[payload.errorMessageVals.'transactionId'] </li><br>
<li> <b>fullErrorDetailsInMulesoft: </b> #[payload.errorMessageVals.'fullErrorDetailsInMulesoft'] </li><br>
<li> <b>Error_Code: </b> #[vars.httpStatus] </li><br>
<li> <b>Date And Time Of Failure: </b> #[payload.errorMessageVals.'Date And Time Of Failure'] </li><br>
</body>
</html>
I am storing in the variable called example and printing in the console through logger component.

img-8
Now configuring the cloud hub.

img - 9
Click on "+" in the connector configuration and provide the anypoint credentials. Select the
environment as Sandbox. Please refer the below screen shot for your reference.

img - 10
Provide the domain name as customer-e-api which means the name you have given in the runtime
manager that is already deployed.
We are consuming the parse template which is stored in a variable called "message", hence we will
provide "vars.example" in the "Message" field.
This is how you configure the cloudhub create notification in the anypoint studio.
Now go to your anypoint platform ---> Runtime Manager --> Alerts --> Create Alert.

img -11
Now provide the name of the alert, severity level and conditions.

img - 12

img - 13
Contains plays a crucial role, so if the error message contains "fullErrorDetailsinMulesoft" attribute
(you can refer img-3 for your reference) then only error triggers.

img -14
you can provide the Gmail account in the recipients and click on submit.
Finally, you must provide a flow reference in the customer-e-api as shown in the below image.

img-15
I am testing through postman.

img -16
I have given the endpoint as getCustomer1 which is not an actual endpoint, hence it raises an error
that is 404 Not Found.

img -17
You can see an alert has generated to mail.
This is the way how you create the Alert Notification.
I hope this blog is helpful!
If any queries, please reach out and drop an email to bodhini2002@gmail.com.
Happy Learning😊!
Thanks & Regards,
Bodhini


Good work....
ReplyDeleteGood work...
ReplyDeleteNice keep it up
ReplyDelete